DS2002 Data Science Systems
Course materials and documentation for DS2002
Cloud Computing
The goal of this activity is to familiarize you with cloud computing concepts and services. Cloud computing is essential for scalable data processing, accessing powerful computing resources on-demand, and building modern data science infrastructure.
If the initial examples feel easy, challenge yourself with the Advanced Concepts section and the resource links at the end of this document.
- Start with the In-class exercises, which introduce Amazon EC2 (console and CLI).
- Complete Lab 09: EC2.
- Continue with Additional Practice (Python scripts) on your own time.
- Optional: Explore the Advanced Concepts if you wish to go deeper into EC2, EBS, and related topics.
In-class exercises
Managing EC2 instances in AWS Console
Step 1: Log into AWS Academy
-
You should have received an email to your UVA account with an invitation to the AWS Academy Cloud Foundations course.
-
If you haven’t done so yet, follow the AWS Academy account setup instructions to get your account ready.
Step 2: Complete the Introduction to Amazon EC2 lab
-
On the AWS Academy Canvas page, navigate to
Modules>Module 6 - Compute>Lab 3 Introduction to Amazon EC2 -
Follow the lab instructions. When you click Start Lab, wait until the AWS indicator light turns green.
-
Click on the AWS link when the indicator turns green. A new browser tab should open with the
AWS Management Console.
-
Submit your work in AWS Academy.
-
End the AWS Academy lab.
Additional Practice
Managing Amazon EC2 instances from the command line
Creating an Amazon EC2 instance from the command line is primarily done using the aws ec2 run-instances command. Before running this command, you must have the AWS CLI installed and configured with your credentials.
Prerequisites
AWS IAM user
For the shared course account you use the ds2002-user setup from Lab 08; for a personal account, see Create AWS IAM user.
AWS CLI setup
The aws CLI must be installed and configured (credentials and default region). Follow Lab 08: Setup (environment, aws configure, and optional boto3).
Step 1: Gather AWS identifiers
You will need to gather several identifiers from your AWS environment before launching:
- AMI ID: The Amazon Machine Image ID (e.g., ami-0abcdef1234567890).
- Instance Type: The hardware specification (e.g., t2.micro).
- Subnet ID: The ID of the VPC subnet where the instance will reside.
- Security Group ID: One or more security group IDs to control traffic.
- Key Pair Name: The name of the SSH key pair for logging in.
Where to find these identifiers in the AWS Console:
- AMI ID:
- Go to EC2 → AMIs in the left sidebar
- Browse available AMIs or search for “Ubuntu” (e.g., “Ubuntu Server 22.04 LTS”)
- Copy the AMI ID (starts with
ami-)
- Instance Type:
- When launching an instance, you’ll see a list of instance types
- For learning purposes,
t2.microort3.microare often eligible for the AWS Free Tier - See EC2 Instance Types for details
- Subnet ID:
- Go to VPC → Subnets in the AWS Console
- Select a subnet in your desired availability zone
- Copy the Subnet ID (starts with
subnet-)
- Security Group ID:
- Go to EC2 → Security Groups
- Create a new security group or use an existing one
- Ensure it allows SSH (port 22) from your IP address so that you can connect via SSH from the command line
- Copy the Security Group ID (starts with
sg-)
- Key Pair Name:
- Go to EC2 → Key Pairs
- Create a new key pair or use an existing one
- Download the
.pemfile and store it securely - Note the key pair name (you’ll use this in the command)
- Change file permissions to read-only by user (you)
chmod 400 MyKeyPair.pem # replace name with actual filename
Step 2: Core CLI command
The basic syntax for launching a single instance is:
aws ec2 run-instances \
    --image-id ami-0abcdef1234567890 \
    --instance-type t2.micro \
    --key-name MyKeyPair \
    --security-group-ids sg-0123456789abcdef0 \
    --subnet-id subnet-0123456789abcdef0 \
    --count 1
Note: Replace all placeholder values (AMI ID, instance type, key pair name, security group ID, subnet ID) with your actual AWS values.
--key-nameis the key pair name in EC2 (e.g.MyKeyPair), not the path to the.pemfile.
We do not need to set the virtual private cloud ID (VPC ID): --subnet-id already picks the VPC (each subnet is tied to one VPC, so the instance is launched in that VPC automatically). In addition, --security-group-ids must reference security groups in that same VPC.
Useful optional parameters
- Tagging: add a
Nametag so the instance is easy to spot in the console, for example:--tag-specifications 'ResourceType=instance,Tags=[{Key=Name,Value=MyServer}]'Example using your Linux username in the tag value (paste as one argument to
run-instances):--tag-specifications 'ResourceType=instance,Tags=[{Key=Name,Value=ds2002-'"$USER"'}]' - User data: pass a script to run on first boot (bootstrapping). Use
--user-data file://bootstrap.sh(see User Data & Bootstrapping). Optional. - Monitoring: enable detailed CloudWatch monitoring:
--monitoring "Enabled=true"What is CloudWatch monitoring? Amazon CloudWatch collects metrics and logs from your EC2 instances. By default, EC2 instances have basic monitoring (free) which collects metrics at 5-minute intervals. Enabling detailed monitoring collects metrics at 1-minute intervals, providing more granular data for performance analysis and troubleshooting. Note that detailed monitoring incurs additional charges. For learning purposes, basic monitoring is usually sufficient.
Post-launch steps
Check status: verify the instance state (pending, running, etc.):
aws ec2 describe-instances --instance-ids <instance-id>
Connect via SSH: once the status is running, retrieve the public IP and connect with your private key (.pem file):
# Get the public IP address
aws ec2 describe-instances --instance-ids <instance-id> --query 'Reservations[0].Instances[0].PublicIpAddress' --output text

# Connect via SSH (use ubuntu as the username for Ubuntu AMIs)
ssh -i "MyKeyPair.pem" ubuntu@<public-ip-address>
SSH into your instance
- Find your instance ID if you do not have it yet: in the AWS Console go to EC2 → Instances, select your instance, and copy Instance ID. From the CLI you can list running instances with
aws ec2 describe-instances --query 'Reservations[*].Instances[*].[InstanceId,State.Name,PublicIpAddress]' --output table. - Run the Post-launch steps commands above: use
describe-instancesto get the public IP, thenssh -i "MyKeyPair.pem" ubuntu@<public-ip-address>(replace the key filename and IP). On first connect, typeyeswhen prompted to trust the host key. - If SSH fails with “Permission denied (publickey)”: confirm the key path (
-i), that the.pempermissions arechmod 400, that you useubuntufor Ubuntu AMIs (orec2-userfor Amazon Linux, oradminfor Debian Linux), and that your security group allows inbound TCP 22 from your current public IP. - After login, run
hostnameorwhoamito confirm you are on the EC2 instance asubuntubefore continuing to Perform system admin tasks below.
Perform system admin tasks
After you SSH into your instance, work through these basic system administration tasks. Full reference: Basic sysadmin tasks for a new EC2 instance (nmagee).
Software
sudo apt update
sudo apt upgrade -y
sudo apt install -y <package-name>
Try installing ncal (provides the cal command), python3-boto3, and sudoku. There is no Ubuntu package literally named cal; use ncal or install bsdextrautils if you only want /usr/bin/cal.
sudo apt install -y ncal python3-boto3 sudoku
Or install them one at a time (replace <package-name> in the generic example above with each name in turn).
Timezone
sudo tzselect
Inspect disk usage / file size
df -h
sudo du -sh /*
sudo du -sh /home/ubuntu/largefile.tar.gz
View processes
top
# optional: sudo apt install -y htop && htop
Stop a runaway process with kill -9 <PID> (use the PID from top or htop). Hit q on your keyboard to exit top.
Add a user
sudo adduser mst3k
Even with a password set, users cannot SSH with a password by default; SSH keys are required. Set up authorized_keys for the new account (commands below run after sudo su - mst3k, or adjust paths if you use another username):
sudo su - mst3k
cd ~
mkdir .ssh
chmod 700 .ssh
touch .ssh/authorized_keys
chmod 600 .ssh/authorized_keys
chown mst3k:mst3k .ssh/authorized_keys
Then paste the public SSH key for mst3k into the first line of ~/.ssh/authorized_keys (while still logged in as mst3k, or use sudo nano /home/mst3k/.ssh/authorized_keys from ubuntu).
Connect as new user mst3k
After you have added mst3k’s public key to /home/mst3k/.ssh/authorized_keys, SSH using the same key pair and public IP as before, but with the new username:
ssh -i MyKeyPair.pem mst3k@<public-ip-address>
Replace MyKeyPair.pem with your key file name and <public-ip-address> with the instance’s public IP (the same value you used for ubuntu@). If connection is refused, confirm the key is on a single line in authorized_keys, permissions are 700 on .ssh and 600 on authorized_keys, and the security group still allows SSH (port 22) from your IP.
Run a simple web service (Nginx)
This is a minimal pattern for “something listening on the network” after you have an Ubuntu instance (same idea extends Lab 09: EC2).
- Security group: the default “SSH only” group blocks browsers.
- In EC2 → Instances, select your EC2 instance, then go to
Actions → Security → Change Security Groups. - In the
Associated security groupssearch box, enternginxand select the security group that pops up. This security group was created for you in the ds2002-user account. If you use your own AWS account, you’ll need to create the security group yourself first.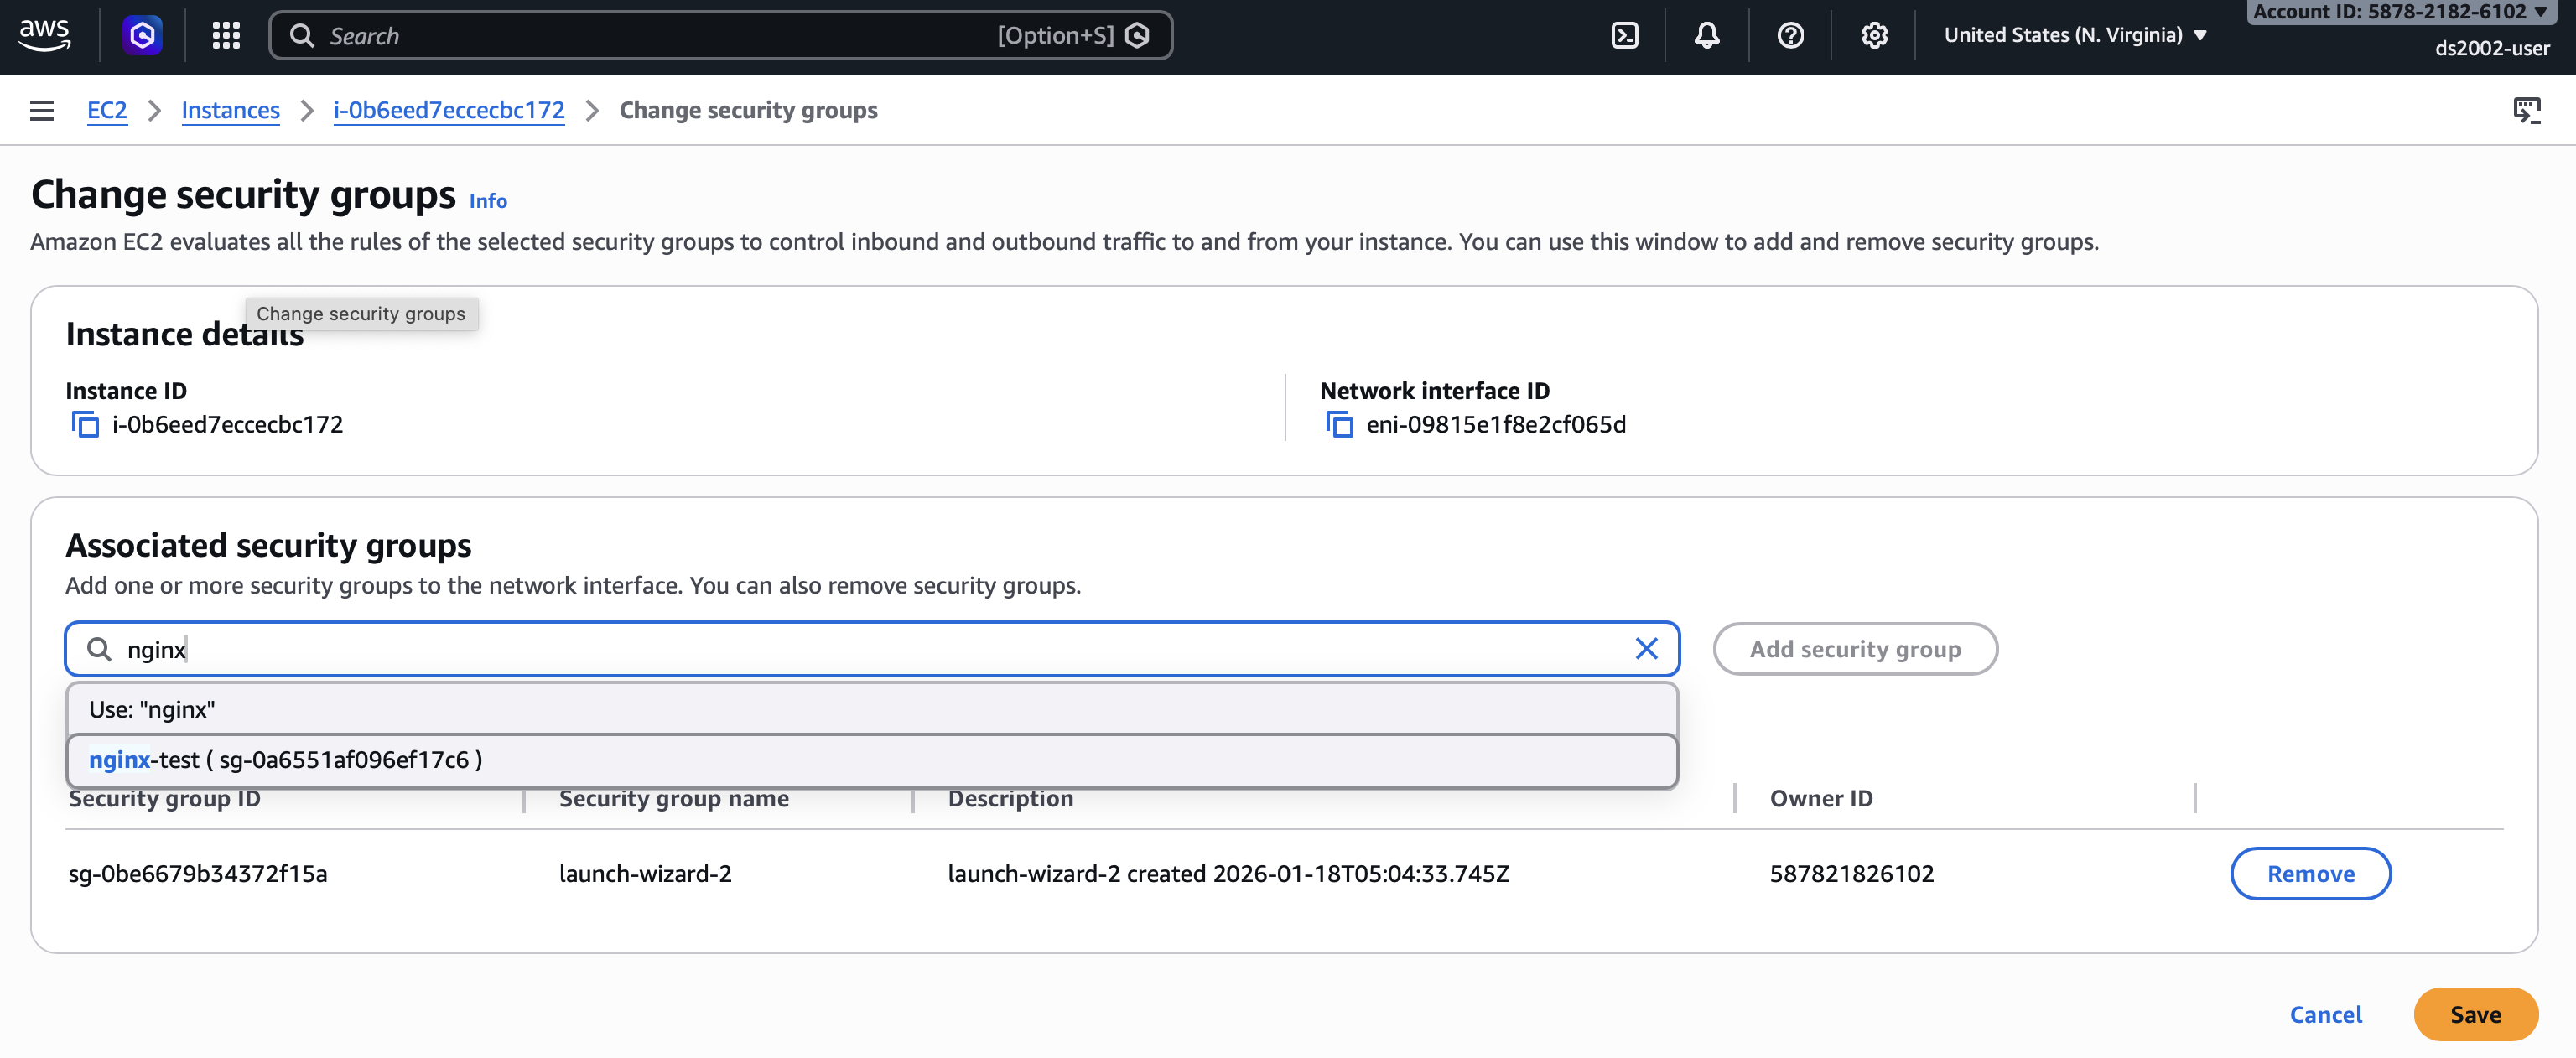
- Click
Add security group.
- In EC2 → Instances, select your EC2 instance, then go to
-
On the instance (SSH as
ubuntu):sudo apt update sudo apt install -y nginx sudo systemctl enable --now nginx curl -s -o /dev/null -w "%{http_code}\n" http://127.0.0.1/You should see
200. - From your laptop: open
http://<public-ip>/in a browser (use the instance’s public IPv4 from the console ordescribe-instances). You should get the default Nginx welcome page.
To remove the service later: sudo apt remove -y nginx (optional). If you attached a separate security group for HTTP, remove that association or delete the inbound HTTP (port 80) rule when you no longer need it.
Resizing an instance
To give a running VM more or less CPU/RAM, change its instance type (for example from t2.nano to t2.micro after you hit memory limits on a workload from Lab 09: EC2). The root disk is separate; growing EBS volume size is covered in Add storage (EBS volume) below.
AWS Management Console
- Open EC2 → Instances, select your instance.
- Instance state → Stop instance and wait until State is
stopped(you cannot change type while the instance is running). - Actions → Instance settings → Change instance type, choose the new type, then Apply.
- Instance state → Start instance. Confirm SSH still works; the public IP may change unless you use an Elastic IP.
AWS CLI (replace i-… and the type; same stop → change → start sequence):
aws ec2 stop-instances --instance-ids i-0123456789abcdef0
# Wait until State.Name is "stopped" (describe-instances or console).
aws ec2 modify-instance-attribute \
  --instance-id i-0123456789abcdef0 \
  --instance-type Value=t2.micro
aws ec2 start-instances --instance-ids i-0123456789abcdef0
Your account must be allowed to launch the target instance type in that Availability Zone. If Change instance type is grayed out, check that the instance is fully stopped and that the new type is supported on the same hardware/Nitro platform.
Terminate instance
To avoid ongoing charges, terminate the instance when finished:
aws ec2 terminate-instances --instance-ids <instance-id>
For a complete list of run-instances options, see the AWS CLI reference for ec2 run-instances.
Managing Amazon EC2 instances with Python (boto3)
Runnable examples live in this folder (same boto3 setup as Practice 09: default credentials chain).
-
01-list-instances.py— print every instance the account can see (describe_instances). Each line: instance id, state, type, public IP (or-), Name tag. SetREGIONat the top of the file, then run:python3 01-list-instances.py -
02-create-security-group.py— create a new security group in a VPC and open SSH (port 22). Prints the newsg-…id (group names must be unique per VPC). EditREGION,VPC_ID,GROUP_NAME, and related constants at the top, then runpython3 02-create-security-group.py. -
03-launch-instance.py— launch a single instance into an existing subnet using one or more security groups. Edit the constants at the top (IMAGE_ID,SUBNET_ID,SECURITY_GROUP_IDS, etc.). SetUSER_DATA_FILEto a path likebootstrap.shto pass user data, or leave it""(see User Data & Bootstrapping). Then runpython3 03-launch-instance.py. -
04-terminate-instances.py— terminate the instance IDs listed inINSTANCE_IDSat the top of the file. Irreversible—confirm IDs with01-list-instances.py,aws ec2 describe-instances, or the console first. Then runpython3 04-terminate-instances.py.
Core API calls use keyword arguments with PascalCase keys (ImageId, MinCount, MaxCount, …), not JSON-style strings.
Advanced Concepts (Optional)
Add storage (EBS volume)
Amazon EBS (Elastic Block Store) provides durable, block-level volumes you attach to an EC2 instance in the same Availability Zone. The OS sees them as disks (/dev/xvdf, NVMe devices, etc.): you format a filesystem, mount directories, and read/write random blocks—much like a USB drive or server disk. EBS is the usual place for boot disks and extra data on VMs. By contrast, S3 in Practice 09 is object storage (buckets, keys, HTTP-style GET/PUT)—not a mountable block device for a single running instance.
- Find the availability zone (AZ) for your instance (AWS Console → EC2 → instance details).
- Create an additional EBS volume in that AZ (AWS Console → EC2 → Volumes).
- Attach the volume to your instance (AWS Console).
- From a terminal, SSH to the instance and check attachment with
sudo fdisk -lorlsblk. Note the device name (e.g./dev/xvdfor/dev/nvme1n1on newer instance types). -
Create a mount point (usually under
/mnt):sudo mkdir -p /mnt/vol2 -
Format the volume (use the device you saw in step 4):
sudo mkfs -t ext4 /dev/xvdf -
Mount the formatted device:
sudo mount /dev/xvdf /mnt/vol2 - Verify with
df -h. Create and delete a test file under/mnt/vol2. -
Manual mounts do not persist after reboot. To mount automatically, add a line to
/etc/fstab(edit withsudo nano /etc/fstab):/dev/xvdf /mnt/vol2 ext4 defaults,nofail 0 2Use your actual device path if it differs.
User Data & Bootstrapping
When you launch an instance, user data is a blob of text stored with the instance metadata. On common Linux AMIs (Ubuntu, Amazon Linux), if that text begins with #! (a shebang), it is typically run once as root on first start—a simple way to bootstrap the machine (install software, write config, enable services) before you SSH in.
Use the same AWS CLI configuration and region you used in Practice 09 (IAM & S3). The file:// path is read on your machine when you run aws ec2 run-instances, not on the instance.
Example — Ubuntu AMI: save the following as bootstrap.sh in your current directory:
#!/bin/bash
set -eux
export DEBIAN_FRONTEND=noninteractive
apt-get update -y
# Matches the Python examples in Practice 09 (boto3); use python3-pip + pip if you prefer
apt-get install -y python3-boto3
python3 -c "import boto3; print('boto3', boto3.__version__)" >> /var/log/bootstrap-user-data.log
echo "bootstrap finished at $(date -u)" >> /var/log/bootstrap-user-data.log
Launch with user data (add your real AMI, network, and key values):
aws ec2 run-instances \
    --image-id ami-0abcdef1234567890 \
    --instance-type t2.micro \
    --key-name MyKeyPair \
    --security-group-ids sg-0123456789abcdef0 \
    --subnet-id subnet-0123456789abcdef0 \
    --count 1 \
    --user-data file://bootstrap.sh
After the instance is running, SSH in and read /var/log/bootstrap-user-data.log, or run python3 -c "import boto3". User data does not run again on ordinary reboots; to re-run setup you would need a new instance or a different automation tool (e.g. Systems Manager).
On Amazon Linux, replace the apt-get / DEBIAN_FRONTEND block with the appropriate dnf or yum commands for that AMI.
Tagging your EC2 instance
Tags are key/value strings attached to an instance (and other AWS resources). The Name tag is what the EC2 console shows in the “Name” column—without it, you only see the instance ID. Other tags are optional (for example Project, Owner, Environment) and can help with filtering, billing reports, and IAM policies.
Console: select the instance → Tags tab → Manage tags → add Name and any other keys → save.
At launch (AWS CLI): pass one or more tags in a single specification (repeat ResourceType=instance,Tags=[...] if you need multiple tag-spec blocks):
aws ec2 run-instances \
  --image-id ami-0123456789abcdef0 \
  --instance-type t2.micro \
  --key-name MyKeyPair \
  --security-group-ids sg-0123456789abcdef0 \
  --subnet-id subnet-0123456789abcdef0 \
  --count 1 \
  --tag-specifications 'ResourceType=instance,Tags=[{Key=Name,Value=ds2002-mst3k},{Key=Course,Value=ds2002}]'
After the instance exists: use the instance ID from describe-instances or the console:
aws ec2 create-tags \
  --resources i-0123456789abcdef0 \
  --tags Key=Name,Value=ds2002-mst3k Key=Course,Value=ds2002
Tag keys are case-sensitive. For the same pattern as S3 bucket naming in Practice 09, many students use a Name like ds2002-<computing id> (see Lab 09: EC2).
Serverless computing with AWS Lambda
AWS Lambda runs short functions on demand without you managing a server.
Supported languages:
Lambda provides managed runtimes for widely used stacks, including Node.js, Python, Ruby, Java, and .NET (each major language version maps to a runtime identifier such as python3.12 or nodejs22.x). For Go, Rust, and other compiled languages, you typically use an OS-only (provided) runtime and ship a bootstrap binary; you can also supply a custom runtime or deploy the function as a container image. Supported versions and deprecation dates change over time—see the official table: Lambda runtimes.
What can trigger a function?
Besides your own code calling Lambda through the AWS SDK, many services can start a run in two main ways. Event-driven triggers push JSON events when something happens (for example Amazon S3 object creates, SNS notifications, EventBridge rules and schedules, API Gateway or Application Load Balancer HTTP requests, CloudWatch Logs subscription filters, Cognito, SES inbound mail, Config, IoT, CodePipeline, Step Functions tasks, and CloudFormation custom resources). Event source mappings make Lambda poll a stream or queue (SQS, Kinesis, DynamoDB streams, MSK / self-managed Kafka, Amazon MQ, DocumentDB). Invocations can be synchronous (the caller waits for your return value) or asynchronous (Lambda queues the event). AWS maintains an authoritative table of integrations: Invoking Lambda with events from other AWS services.
Example:
S3 can invoke a function automatically when objects are created (or deleted)—a common pattern for “file landed in a bucket → process it.” This ties naturally to the buckets and uploads you used in Practice 09 (IAM & S3); see also S3 event notifications.
Minimal handler (Python 3.x) — logs each object’s bucket and key. Paste into the Lambda console Code tab, or save as lambda_function.py and upload as a .zip containing only that file:
import json

def lambda_handler(event, context):
    """React to S3 ObjectCreated* notifications."""
    for record in event.get("Records", []):
        if record.get("eventSource") != "aws:s3":
            continue
        bucket = record["s3"]["bucket"]["name"]
        key = record["s3"]["object"]["key"]
        # CloudWatch Logs shows this when the function runs
        print(f"S3 event: s3://{bucket}/{key}")
    return {"statusCode": 200, "body": json.dumps({"processed": len(event.get("Records", []))})}
Wire it up (console, high level):
- Lambda → Create function → choose a Python runtime → paste the code above → Deploy.
- Under Triggers → Add trigger → S3 → pick a bucket (for example one you created in Practice 09) → Event types: All object create events (or a subset such as
PUT) → save. The console adds the permissions S3 needs to invoke your function. - Upload a small test file to that bucket prefix (same region as the function). Open Monitor → View CloudWatch Logs and confirm you see the
S3 event: s3://…lines.
For a real pipeline you would add error handling, idempotency (S3 may retry deliveries), and often S3 GetObject permissions on the function role if the code must read file contents—the snippet above only uses metadata present in the event.