DS2002 Data Science Systems
Course materials and documentation for DS2002
Automation of Data Pipelines
The goal of this activity is to familiarize you with building and managing data pipelines. Data pipelines are essential for automating data workflows, processing data at scale, and creating reliable systems for transforming and moving data between systems.
Note: Work through the examples below in your terminal (Codespace or local), experimenting with each command and its various options. If you encounter an error message, don’t be discouraged—errors are learning opportunities. Reach out to your peers or instructor for help when needed, and help each other when you can.
The in-class exercises will be introduced as instructor-led demos. Experiment with the code examples and explore the sections below on your own when you are ready. They may provide inspiration for the final projects.
In-class exercises
Cron Jobs
Cron jobs are commands or scripts that run on a schedule on Linux and similar systems (for example every minute while testing, or every day at 2:00). A background service, cron, reads your crontab—a small table of “when” and “what to run”—and starts each line at the right time. Cron is not an interactive login: it does not cd into your repo or load your usual shell config, so you normally give the full path to the script in the crontab line.
How scheduling works (big picture):
- You write a script (here:
01-simple-cron.sh) that does something when it runs. - Make your script executable with
chmod +x. - Note the absolute path of your script.
- Open your crontab with
crontab -eand add one line: the five time fields (minute through day-of-week), then that full path to your script. - A background service
cronwakes up and runs your script at the times you specified. - Cron is not your interactive terminal: it does not
cdinto your project folder and does not load your usual.bashrc. That is why the crontab line must use the full path to the script (e.g./home/mst3k/ds2002-course/practice/12-automation/01-simple-cron.sh).
The five time fields
A crontab line starts with five fields (minute, hour, day-of-month, month, day-of-week), then the command to run.
* * * * *  command goes here
│ │ │ │ │
│ │ │ │ └── day of week (0–7, Sunday = 0 or 7)
│ │ │ └──── month (1–12)
│ │ └────── day of month (1–31)
│ └──────── hour (0–23)
└────────── minute (0–59)
* means “every” for that column. So * * * * * means every minute (useful for a short test; change it later so you are not running jobs forever).
Examples:
| What you want | First five fields |
|---|---|
| Every minute (testing only) | * * * * * |
| Every day at 2:30 AM | 30 2 * * * |
| Every Monday at 9:00 AM | 0 9 * * 1 |
Full reference: man crontab and man 5 crontab on Linux, or search for “crontab guru” online for a helper.
01-simple-cron.sh
01-simple-cron.sh appends one line (timestamp + process ID) to ~/cron-demo/runs.log each time it runs. After you schedule it, you can open that file and see new lines appear when cron fires.
Step A — Install and test the script
-
Full path: In a terminal,
cdto this folder and print the absolute path:cd /path/to/ds2002-course/practice/12-automation pwdCopy that path; you will paste it into crontab.
-
Executable:
chmod +x "01-simple-cron.sh" -
Run once by hand (proves the script works):
./01-simple-cron.sh
cat ~/cron-demo/runs.log
You should see at least one line.
Step B — Schedule it with crontab
-
Open your crontab in an editor:
crontab -e(First time, it may ask which editor to use;
nanois fine.) -
Add one new line at the bottom. Replace
/FULL/PATH/TOwith the real path from Step A (no spaces before the first*):* * * * * /FULL/PATH/TO/ds2002-course/practice/12-automation/01-simple-cron.shSave and exit the editor.
-
Confirm the line was saved:
crontab -l -
Wait one or two minutes, then check the log:
cat ~/cron-demo/runs.logYou should see additional lines (one per minute while the
* * * * *line is present). -
When you are done testing, remove or comment out the line (
crontab -eagain). Otherwise the script keeps running every minute.
Optional: capture cron’s own messages
The script already writes to ~/cron-demo/runs.log. If you also want a file that captures anything the script prints to stdout/stderr (and cron warnings), you can use:
* * * * * /FULL/PATH/TO/01-simple-cron.sh >> "$HOME/cron-demo-cron.log" 2>&1
Python pipelines with Prefect
Prefect is a Python library for orchestrating data workflows: you define small units of work as tasks, wire them together in a flow, and optionally schedule or observe runs. The three scripts below share the same shape of pipeline; 02-etl.py is plain Python, while 03-etl-prefect.py and 04-etl-prefect-scheduled.py express it with Prefect.
What the example pipeline does
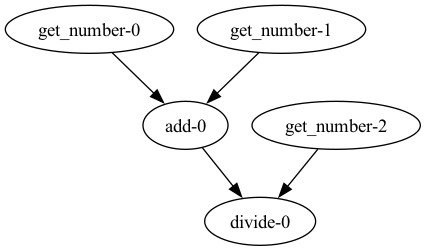
In all three files, the logic is:
- Draw two random integers, add them (the add step takes a list of two numbers and uses Python’s built-in
sum). - Draw a third random integer.
- Divide (sum of the first two) ÷ (third number) and print a line starting with
Result:.
In 02-etl.py, 03-etl-prefect.py, and 04-etl-prefect-scheduled.py, the first two draws use get_number() with default range 0–10, and the third uses get_number(min_value=1, max_value=3) so the division step stays a small demo without huge quotients.
Setup
Install Prefect in the environment where you run the demos (your laptop, VM, or Codespace):
python3 -m pip install prefect
Then from this folder:
python3 02-etl.py
python3 03-etl-prefect.py
python3 04-etl-prefect-scheduled.py
Optional: Register for a free Prefect Cloud account and set up a Prefect API key.
- Sign up for a free account: Prefect pricing (Start plan)
- Sign in to your Prefect account and create an API key. In Prefect Cloud go to
Home>Settings>API Keys. Create and copy the API key (it starts withpnu_). - In your terminal (local, AWS EC2 instance, UVA HPC system, etc.) run
prefect cloud login -k pnu_your_api_key_here
02-etl.py — plain Python baseline
Let’s start with a simple Python script that performs a few mathematical operations on three random numbers.
get_number()— returns a random integer.add(numbers)— returnssum(numbers)for a list of two ints.divide(n1, n2)— returnsn1 / n2.main()— calls those functions in order: two numbers, add, third number, divide, print.
Example output:
Getting number: 1
Getting number: 5
Adding [1, 5]
Getting number: 2
Dividing 6 by 2
Result: 3.0
Note: The order of execution is strictly defined by the sequence of function calls in the
main()function.
03-etl-prefect.py — tasks, flows, and .submit()
Just with a few small tweaks we can convert the Python script into a Prefect workflow:
@taskwrapsget_number,add, anddivideso Prefect can track each call as its own unit of work.@flow(name="Numbers Workflow", log_prints=True)wrapsmain()as a single pipeline aka a flow run. Thelog_prints=Truesendsprintoutput into Prefect’s logging system..submit()— insidemain(), the calls toget_number,add, anddivideare changed to use the.submit()method (provided by the@taskdecorators). For example,number1 = get_number()becomesnumber1 = get_number.submit(). That lets Prefect run those tasks with its own scheduling (a stepping-stone toward parallel execution)..result()— turns a future from.submit()into the task’s real return value.03-etl-prefect.pyonly needs this on the last step:divide.submit(sum, number3).result(), soprintlogs an actual number.
The task implementations (get_number, add, divide) match the plain-Python script; only main() changes to use Prefect’s .submit() / .result() pattern.
Run it:
python3 03-etl-prefect.py
Example output (your flow and task run IDs will differ):
23:05:12.773 | INFO    | Flow run 'icy-raven' - Beginning flow run 'icy-raven' for flow 'Numbers Workflow'
23:05:12.776 | INFO    | Flow run 'icy-raven' - View at https://app.prefect.cloud/…
23:05:12.791 | INFO    | Task run 'get_number-924' - Getting number: 10
23:05:12.791 | INFO    | Task run 'get_number-fcb' - Getting number: 6
23:05:12.794 | INFO    | Task run 'get_number-9ba' - Getting number: 3
23:05:12.795 | INFO    | Task run 'get_number-fcb' - Finished in state Completed()
23:05:12.795 | INFO    | Task run 'get_number-924' - Finished in state Completed()
23:05:12.796 | INFO    | Task run 'get_number-9ba' - Finished in state Completed()
23:05:12.803 | INFO    | Task run 'add-726' - Adding [6, 10]
23:05:12.804 | INFO    | Task run 'add-726' - Finished in state Completed()
23:05:13.053 | INFO    | Task run 'divide-4bd' - Dividing 16 by 3
23:05:13.054 | INFO    | Task run 'divide-4bd' - Finished in state Completed()
23:05:13.055 | INFO    | Flow run 'icy-raven' - Result: 5.333333333333333
23:05:13.788 | INFO    | Flow run 'icy-raven' - Finished in state Completed()
If you omit .result() on the last .submit(), the value passed to print may be a future object instead of a number. For learning, focus on task boundaries and logs in the Prefect UI (below) if you use a server or Cloud workspace.
04-etl-prefect-scheduled.py — same flow, served on a schedule
The flow definition (@task / @flow / main()) matches 03-etl-prefect.py. The module already imports Interval, datetime, and timedelta at the top. Under if __name__ == "__main__":, it calls main.serve(...) instead of main():
if __name__ == "__main__":
    main.serve(
        name="Numbers Workflow - Scheduled",
        schedule=Interval(
            timedelta(minutes=1),
            anchor_date=datetime(2026, 4, 4, 0, 0),
            timezone="America/New_York",
        ),
    )
main.serve(...)— registers this flow as a deployment and starts a long-running process that will executemainaccording to the given schedule (similar in spirit to cron, but driven by Prefect’s scheduler).schedule=Interval(timedelta(minutes=1), anchor_date=..., timezone="America/New_York")— runs about once per minute from the anchor onward; change the interval, anchor, or timezone for your own demo.name="Numbers Workflow - Scheduled"— deployment label in the Prefect UI.
Start it:
python3 04-etl-prefect-scheduled.py
Leave the process running while you inspect runs. Stop it with Ctrl+C when you are done so you do not leave a tight loop running on shared machines.
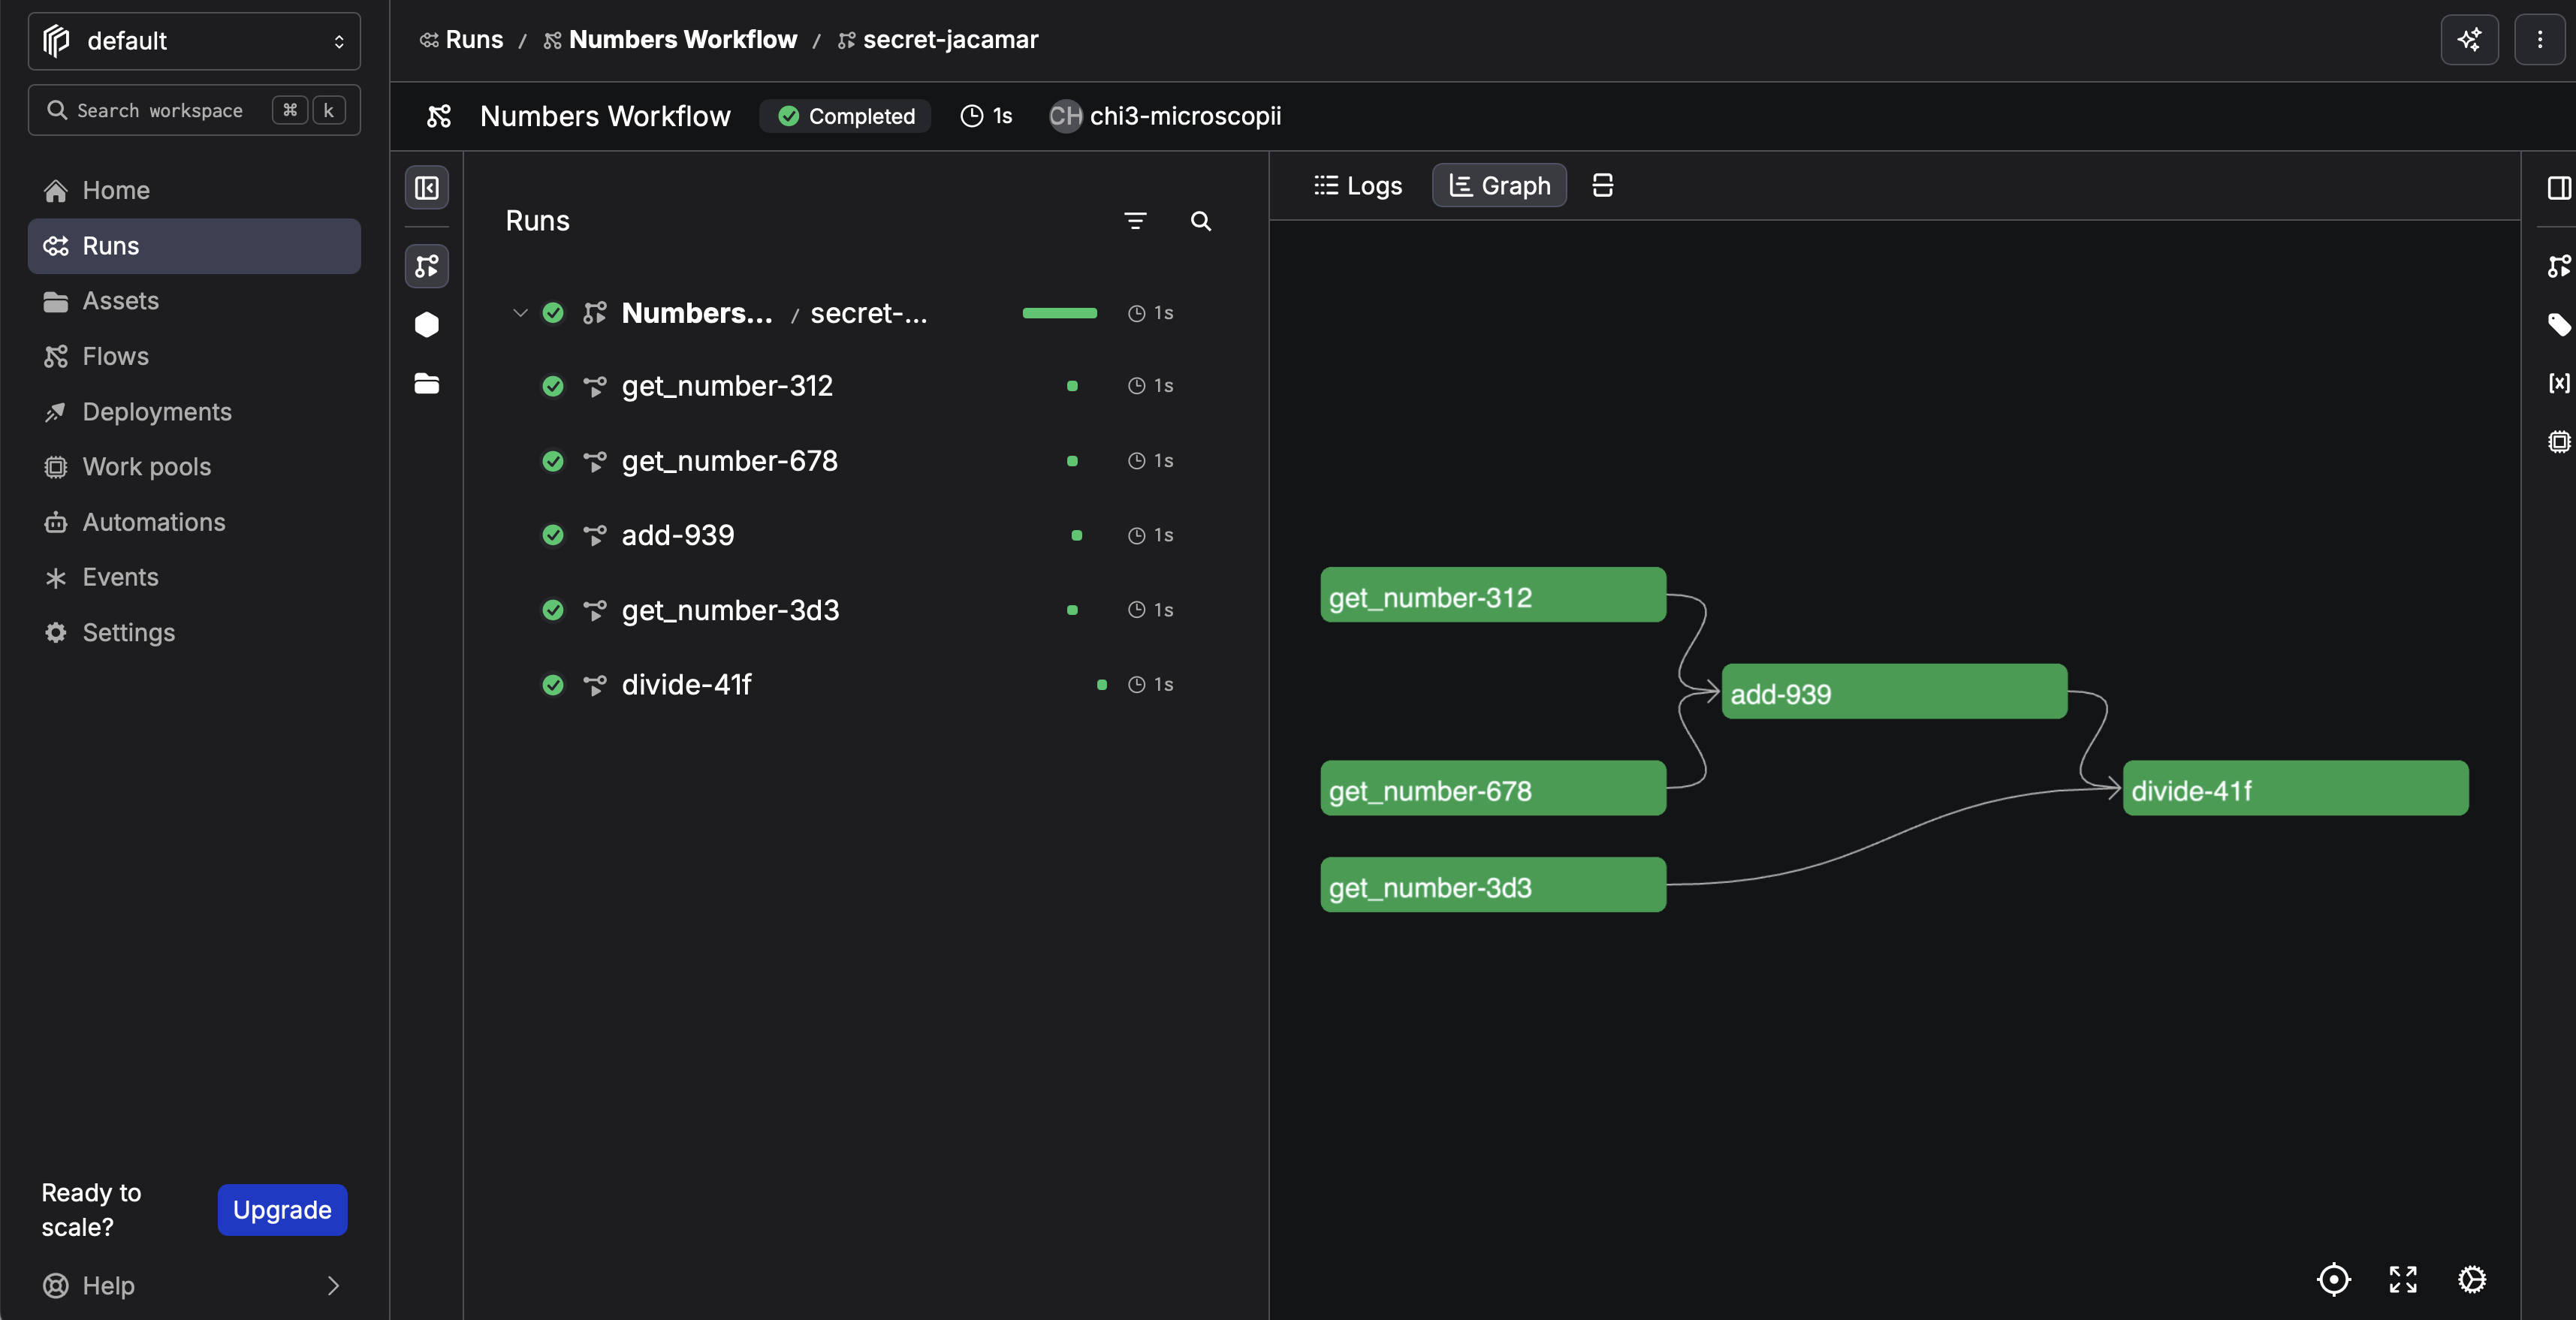
Prefect UI (local or Cloud)
Prefect can show a run history, task timeline, and logs in a browser:
- Local: run
prefect server start(see Prefect server docs) and open the URL it prints; configure your environment/workspace per current Prefect 2.x/3.x docs. - Prefect Cloud: sign up at prefect.io and connect your workspace so deployments and
serveruns appear in the hosted UI.
Prefect Integrations
Prefect ships blocks and integrations (S3, Snowflake, Slack, etc.) so flows can talk to external systems with less boilerplate. This demo stays minimal on purpose; for S3 and other connectors, start from the Integrations section of the Prefect documentation.
Event-triggered Pipelines with AWS Chalice
AWS Chalice is AWS’s Python framework for serverless apps: you write ordinary Python (routes, handlers, scheduled or event-driven functions), and Chalice packages the code, configures AWS Lambda, API Gateway, and related IAM wiring, and deploys it with a small CLI. It is a good fit when you want HTTP-triggered or AWS-native event automation instead of a long-lived server or only cron on a VM.
Setup
Install Chalice into your course Python environment (venv, Conda ds2002, Codespace, etc.):
python3 -m pip install chalice
Chalice relies on the same AWS credentials and default region as the AWS CLI (~/.aws/credentials and ~/.aws/config). If you have not done this yet, follow the aws configure walkthroughs used elsewhere in the course:
- Lab 08: S3 — Setup — environment,
aws configure, and optionalboto3 - Practice 09: IAM and S3 — AWS CLI configuration — prompts for access key, secret, region, output format, and checks such as
aws sts get-caller-identity - Practice 10: Cloud — also points at Lab 08 for installing and configuring the
awsCLI
Confirm the CLI can reach your account before you deploy with Chalice:
aws sts get-caller-identity
S3 event trigger
This walkthrough creates a tiny Chalice app whose Lambda runs whenever new objects are created in an existing S3 bucket. Chalice wires the bucket’s event notification to your function when you chalice deploy (this path does not support chalice package; see Chalice S3 events).
Step 1. Use a real bucket in your default region.
Create a bucket (console or aws s3 mb) or reuse one from Lab 08. The bucket name must match what you set in app.py in Step 3, and your configured region should match the bucket’s region.
Step 2. Scaffold a project (from a parent directory where you want the new folder):
chalice new-project s3-events
cd s3-events
Step 3. Edit app.py — keep or remove the sample @app.route('/') handler; add or adjust an S3 handler that logs the bucket and object key (visible in CloudWatch and via chalice logs). Set bucket= to your bucket name; events limits notifications to new objects. (The sample under s3-events/app.py in this repo uses chalice-example until you change it.)
from chalice import Chalice

app = Chalice(app_name="s3-event")

@app.on_s3_event(
    bucket="REPLACE_WITH_YOUR_BUCKET_NAME",
    events=["s3:ObjectCreated:*"],
)
def handler(event):
    app.log.info("S3 object created: bucket=%s key=%s", event.bucket, event.key)
Step 4. Deploy (requires IAM permissions to create or update Lambda, roles, and S3 notifications):
chalice deploy
Step 5. Generate an event — upload a test object (bucket name must match bucket= in app.py, e.g. chalice-example if you kept the sample bucket):
echo "hello" > hello.txt
aws s3 cp hello.txt s3://YOUR_BUCKET_NAME/
Step 6. Confirm logs — after a short delay, from the s3-events project directory:
chalice logs -n handler
The -n flag is the name of the Python function in app.py (here, handler). You should see a line containing your bucket name and object key. When you are done experimenting, run chalice delete to tear down the app and remove the deployed resources.
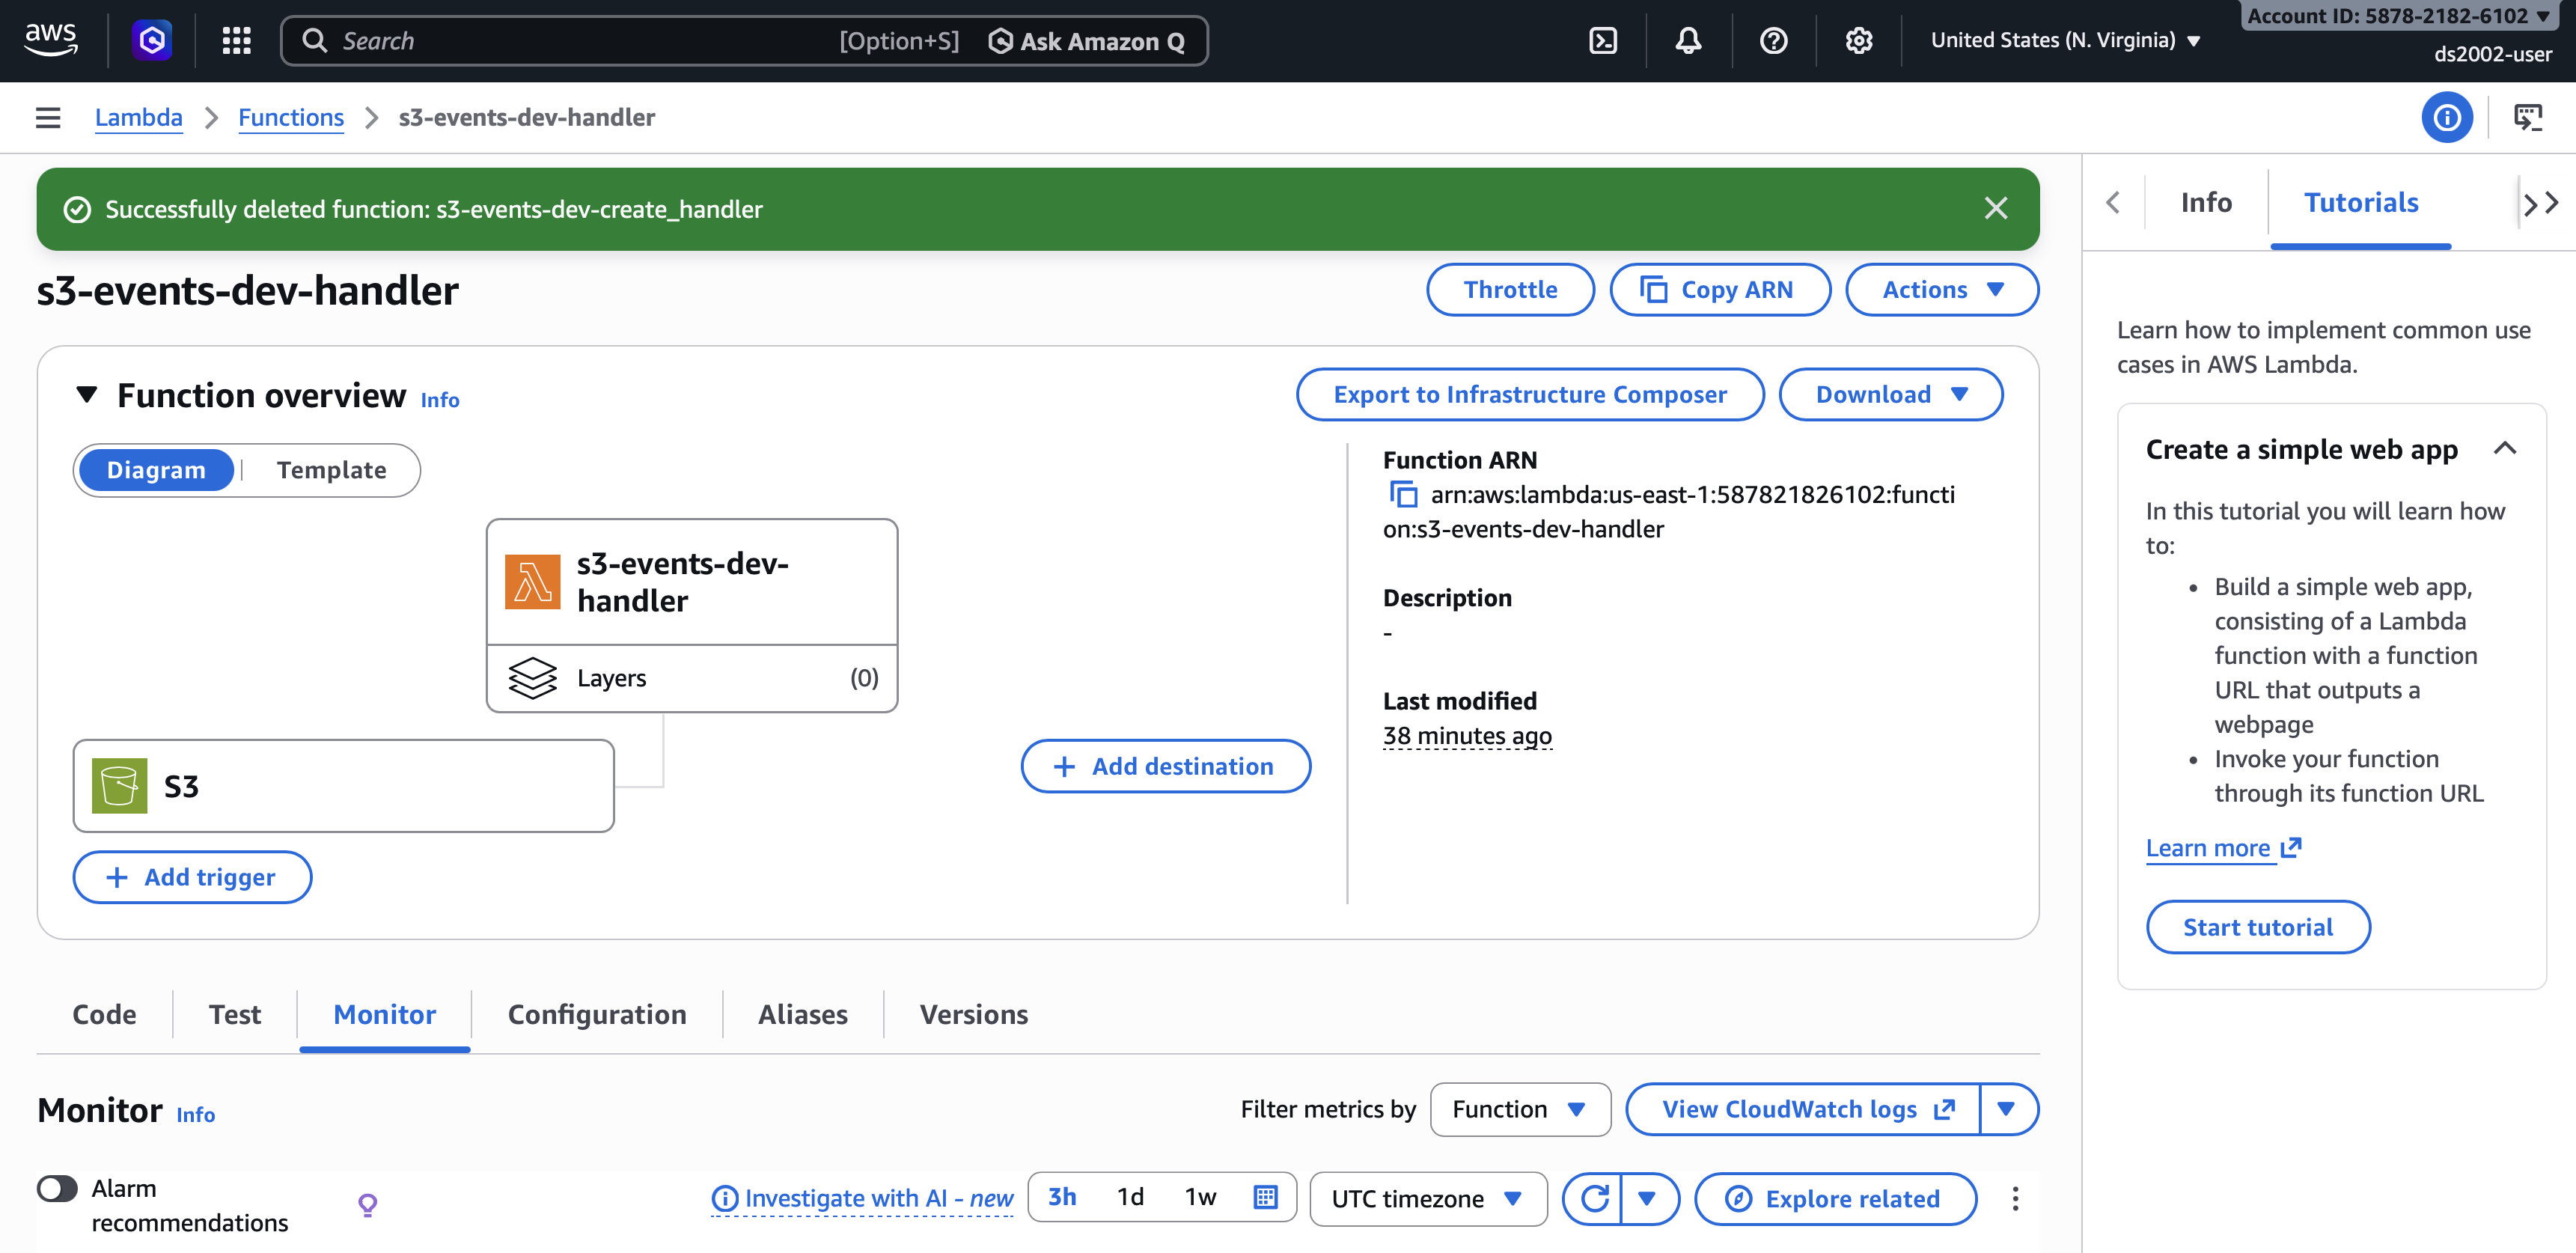
You can also inspect the Lambda function and log streams in the AWS Management Console.
Step 7. (Optional) Change the S3 event handler to implement new behavior, for example transforming an object and copying it to another bucket.
Scheduled Lambda functions with AWS Chalice
Besides S3 notifications, Chalice can attach your code to time-based schedules managed by Amazon EventBridge (CloudWatch Events). When you deploy, Chalice creates a separate Lambda and rule so your function runs on a cron (or rate) expression—similar in spirit to Linux cron, but the job runs in AWS with no server you SSH into.
The snippet below registers a scheduled handler. The string inside cron(...) follows EventBridge’s six-field form: minutes hours day-of-month month day-of-week year. Here, 0 8 is 08:00, ? means “any” for day-of-month (required when day-of-week is set), * is every month, MON-FRI restricts runs to weekdays, and the final * is every year. Times are in UTC unless you configure otherwise in AWS.
When the schedule fires, Chalice invokes daily_at_eight with an event object (metadata about the scheduled run). You can replace the print with real work: call other AWS APIs, run ETL, send notifications, and so on. After editing app.py, run chalice deploy again so the schedule and Lambda stay in sync. See also Chalice scheduled events.
If you already have an app from the S3 walkthrough, do not create a second Chalice(...) instance—add only the @app.schedule function to the same app.py.
from chalice import Chalice

app = Chalice(app_name="scheduled-demo")

@app.schedule("cron(0 8 ? * MON-FRI *)")
def daily_at_eight(event):
    print("Executing on a set schedule")